Overall, I am very pleased with the outcome of this project. Our film opening looks very similar to one I originally envisioned and I am impressed by how we turned a small initial idea into an effective opening.
I believe that we have stayed true to our chosen genres and the idea of creating a British Indie film. I think that the locations I found within Bowyer's Water such as the fishing swim that we used in the film opening look very good and I am glad that we could capture what they really looked like on camera.
I hope that an audience member would understand the character of Craig and like him because of his social awkwardness but also for him gaining the courage to stand up for another person. Members of our target audience commented to me how Craig wasn't a stereotypical gay character which I was really pleased about. I enjoyed seeing our project grow and develop over the weeks and months and it was interesting for me to see how everything that we created such as props and set list really did help in shooting. I now appreciate the importance of all the pre-production planning and the importance of having a test shoot.
If we had more time I would like to have developed the bullying sequence further but overall I have found this experience to be very valuable and enjoyable.
digi out pic

digi in pic

This is a link to my artist website, please click on the image below to go to GiGi Official website:

Monday, 29 February 2016
Construction Post 9: My Technical Learning Curve
My technical ability has increased greatly over the period of creating my film opening sequence. I began with editing being my weakness but learnt lots of skills from having a session from our technician Emma.
In production I improved my skills with the video camera, moving on from the knowledge I gained from completing the preliminary task. I gained more experience from this task as I got better at doing camera movements such as pans. I also improved my framing of shots which was useful when our actor needed to be completely central.
In post-production my technical skills improved greatly. I began the editing period only knowing the very basics such as renaming shots, doing the 'in' and 'out' and cutting the clips down.
By the end of this project my skills and ability in Premier Pro have increased lots as I am now much more confident in using it. I now know how to grade shots and use tools such as the slip tool which is useful in fine cutting of shots.
Overall, I have learnt a lot of technical skills from the construction process from editing our main sequence but from also trying things out on my own version of the sequence such as using the colour wheels and adding effects such as dissolves.
In production I improved my skills with the video camera, moving on from the knowledge I gained from completing the preliminary task. I gained more experience from this task as I got better at doing camera movements such as pans. I also improved my framing of shots which was useful when our actor needed to be completely central.
In post-production my technical skills improved greatly. I began the editing period only knowing the very basics such as renaming shots, doing the 'in' and 'out' and cutting the clips down.
 |
| The basic tools in Premier Pro |
| An example of in and out |
 |
| The tool used to cut shots down |
By the end of this project my skills and ability in Premier Pro have increased lots as I am now much more confident in using it. I now know how to grade shots and use tools such as the slip tool which is useful in fine cutting of shots.
Overall, I have learnt a lot of technical skills from the construction process from editing our main sequence but from also trying things out on my own version of the sequence such as using the colour wheels and adding effects such as dissolves.
 |
| Used for changing what is in the shot |
 |
| The three-way colour wheels |
 |
| Different shot transitions |
Construction Post 8: My Personal Contribution To The Edit Sessions
Editing an opening sequence takes a long time but we worked effectively as a group, doing different tasks within the time we had to edit. For example, some of the tasks that I did were:
- cutting the shots down to the correct length
- grading some shots
- renaming the shots
- looking for continuity errors
- creating some of the titles
- downloaded and edited the Film 4 and BFI logos
 |
| BFI Logo |
 |
| Film 4 Logo |
 |
| I used the video effect of Procamp to grade the shots |
 |
| Post-it notes of continuity errors/improvements that I spotted in editing |
Construction Post 7: My Personal Contribution To The Shoot Sessions
In the shoot sessions I was mainly in charge of the clapper-board which involved me writing on all the different shot numbers and takes. I took this job as I wanted to ensure that we kept to time and used it effectively so that it would save us time when we were editing.
I also filmed some of the earlier shots in the sequence as I was one of the bullies so acted in the conflict scene.
I really enjoyed filming some of the shots as it was interesting to experiment with different angles, shot types and camera movements.
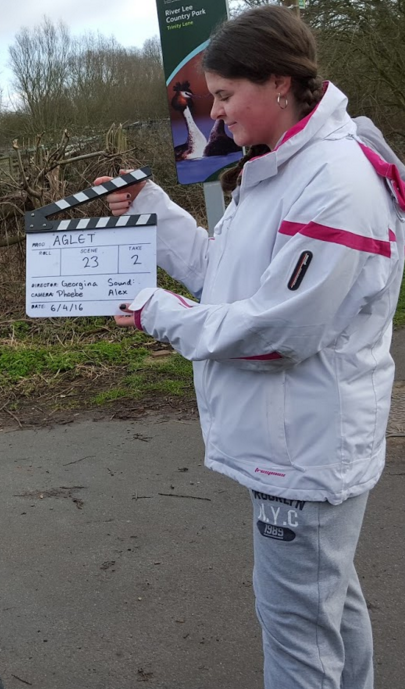 |
| Me using the clapper board |
 |
| Me filming one of the lake shots |
 |
| Me acting |
Construction Post 6: Reflections On Edit Week 2
This is our Edit Schedule for Edit Week 2:
 |
| Our edit schedule for week 2 |
In Edit Week 2 we:
- finished creating titles
- added the titles
- sorted out any sound issues
- graded the shots
- checked for continuity errors
Edit Week 2 has been successful as we met the deadline. For me it has been interesting to see how different the shots look when they were graded.
 |
| A split screen showing before and after grading |
From edit week 2 I have learnt how to grade shots. A member of our target audience said to me how they really liked how Craig now looked more reflective when he was at the lakes-an improvement we had hoped to make.
Construction Post 5: The Back-Up Shoot
The main thing that we had to improve in the Back Up Shoot was the bullying sequence. However, because it was outside we had to re-do everything that was shot at Bowyer's Water.
We watched examples of bullying sequences and decided that we need to have a POV shot from the bullies and Craig as well as a master shot showing all three actors.
In Edit Week 2 we will replace the old shots with the new ones and edit them into our sequence.
We watched examples of bullying sequences and decided that we need to have a POV shot from the bullies and Craig as well as a master shot showing all three actors.
In Edit Week 2 we will replace the old shots with the new ones and edit them into our sequence.
 |
| This is the master shot for the conflict scene |
Construction Post 4: Reflections On Edit Week 1
Below is the edit schedule we filled in, recording when we would come in and edit:
This was useful as it helped us stay organised and ensured we had enough time to edit our sequence effectively.
In Edit Week 1 we:
 |
| Our edit schedule for week 1 |
This was useful as it helped us stay organised and ensured we had enough time to edit our sequence effectively.
In Edit Week 1 we:
- renamed the shots
- identified which takes we would use
- cut the shots down and dragged them onto the timeline
- added our music (the same one that we used in our rough cut)
- recorded and added the new voice over (as members of the target audience commented on how Craig sounded too annoyed so we tried to make him less so.)
- began to add effects such as dissolves
- began to make the titles
In Edit Week 2 we will continue to create and add the titles and will add in all the shots from the back-up shoot.
From this week my skills in editing have improved specifically learning to how make titles.
From this week my skills in editing have improved specifically learning to how make titles.
Construction Post 3: Reflections On Our Main Shoot Session
Compared to our test shoot not as many things went wrong! The main shoot was successful as moving on from the test shoot we had worked out what shots did and didn't work and added new ones and removed some from the shoot board. We kept to time successfully and managed to get all the shots we needed in Alex's house to not have to go there for the Back-Up shoot.
A shot that we changed from our test shoot was when Craig walks through the forest. In the main shoot we used a pan so we had more movement in our opening to make it flow more smoothly.
Overall, the main shoot went relatively well but there were mistakes that we will have to correct/improve in the back-up shoot. These include:
- Waiting for "Action!"
- Starting to act in live time before the camera starts rolling
- Having a longer period of time between the clapper board moving out of shot to action
- Members of our target audience weren't keen on the bullies so next time we will act in a more aggressive manner so that the bullies look scarier
Construction Post 2: Our Post-Production Kit
At school we have used the edit suits to edit our footage. The software we used to edit our sequence is called Adobe Premier Pro. In Premier Pro we can easily switch between the different versions of our opening such as the rough cut. I also have my own version of the opening where I practice my editing skills in my spare time.
Premier Pro is helpful as we can quickly name the shots, drag them onto the timeline, cut them down, add music and the voice over and add any effects that we want (such as dissolves).
We created our titles on Premier and LiveType.
Our other equipment:
 |
| The different versions |
 |
| Premier Pro |
 |
| Me creating titles |
Our other equipment:
- Macbook computer
- Dual monitor edit suit
- Blue Yeti microphone
- Audacity for recording the voiceover
Construction Post 1: Our Production Kit
Our production kit included a camera, headphones, mic, tripod and a clapper board
Our camera is a Canon Legria HFG30. We used the headphones to make sure that the sound was correct and that there was not any background noise. We used the mic to pick up the dialogue clearly and sounds at the lake such as ducks. We used the tripod to change the height of the camera and subsequently change the angle of the shots.
This shows the clapper board which we used to easily record down the shot and take number which saved time in editing when we watched them back as we quickly named the shots.
My skills using the camera have developed significantly and I am now confident using it-which will be essential for future media projects.
 |
| Our kit |
Our camera is a Canon Legria HFG30. We used the headphones to make sure that the sound was correct and that there was not any background noise. We used the mic to pick up the dialogue clearly and sounds at the lake such as ducks. We used the tripod to change the height of the camera and subsequently change the angle of the shots.
 |
| The kit and the clapper board |
My skills using the camera have developed significantly and I am now confident using it-which will be essential for future media projects.
Monday, 1 February 2016
R&P Post 20: Reflections so far/looking ahead
Reflections so far:
Looking back to when production started, all those many...many weeks ago when we first began storyboarding-it seems a very(!!!) long time ago. Despite that, I have enjoyed (most) of it. I never truly heeded the warnings of just how much of my time media would take up but I appreciate it now! But from doing the pre-production for this project it has consolidated my self-motivation and determination to get tasks done successfully and time-effectively but also helped me cope successfully with stressful situations. We have worked well as a group and we all took the leadership role at different times. I am pleased with my contribution as I completed all my tasks on time and to a high standard.
Looking ahead:
Looking ahead to after the main shoot I think that I will enjoy editing what we have created and no longer changing things such as the storyboard. I am looking forward to learning how to grade the shots as it is something that I have never done before.
R&P Post 19: Our Rough Cut
This is our rough cut:
Feedback from our Rough Cut:
It has been very useful to create a rough cut because from doing so we have had contrasting ideas about how to do shots differently, created more opportunities to show continuity and create narrative flow. We managed to take out some shots that were not necessary and successfully got the opening down to just over 2 minutes.
Moving on from the rough cut we have a clearer idea of how to complete our main shoot effectively. Next time we will film the confrontation from all the different shot angles so hopefully we will not have a problem with continuity.
My editing skills have improved by helping to put the sequence together and I have learnt how important a rough cut is as it has given me a clearer idea of what our opening will look like.
Feedback from our Rough Cut:
- raise volume of music
- Alex was in cereal shot
- script the conflict not ad lib
- portray reflective characteristics better
- change storyboard
- run through the whole action-not shoot in small bits
- consistent lighting
- improve voice-over
It has been very useful to create a rough cut because from doing so we have had contrasting ideas about how to do shots differently, created more opportunities to show continuity and create narrative flow. We managed to take out some shots that were not necessary and successfully got the opening down to just over 2 minutes.
Moving on from the rough cut we have a clearer idea of how to complete our main shoot effectively. Next time we will film the confrontation from all the different shot angles so hopefully we will not have a problem with continuity.
My editing skills have improved by helping to put the sequence together and I have learnt how important a rough cut is as it has given me a clearer idea of what our opening will look like.
R&P Post 18: Our Test Shoot
On our test shoot we had lot of fun and got a lot done. Here are some behind the scenes pictures/video:
I really enjoyed the test shoot as we got everything done (to varying degrees of success) and finished on time. However, we had lots of things that went wrong which we had to work around. For example, we were filming at Bowyer's Water and it suddenly began to rain so we had to take shelter under trees until it stopped. When we arrived at the home shooting location the main fuse in the house blew and we had no power. We had to quickly try and get all the shots done we could in the fading natural light!
I believe that the test shoot will be very helpful for our main shoot and our overall project as we now know how and where to film all of our shots which will save time in the main shoot. We found areas that could be improved (e.g. the tone of the voice over) which we can correct for the main shoot.
I really enjoyed the test shoot and I improved my filming skills by trying out different versions of some shots. I also used the clapper-board a lot as I used my organisational skills to make sure that we stayed on time and got enough successful takes.
 |
| Filming one of our shots |
I believe that the test shoot will be very helpful for our main shoot and our overall project as we now know how and where to film all of our shots which will save time in the main shoot. We found areas that could be improved (e.g. the tone of the voice over) which we can correct for the main shoot.
I really enjoyed the test shoot and I improved my filming skills by trying out different versions of some shots. I also used the clapper-board a lot as I used my organisational skills to make sure that we stayed on time and got enough successful takes.
R&P Post 17: Our planned costumes and hair and make-up
We created a costume list (including hair and make-up) which included hair and make-up which clearly shows our reference points and what we want our characters to look like.
I learnt how useful the costume list is as it allowed the actors to find suitable costumes in advance of shooting and it gave them more of an idea of the character they were playing-giving them ownership of their roles.
 |
 |
| Costume, hair and make-up list |
I learnt how useful the costume list is as it allowed the actors to find suitable costumes in advance of shooting and it gave them more of an idea of the character they were playing-giving them ownership of their roles.
R&P Post 16: Casting
We created a cast list/costume list/hair & make-up list all in one that clearly illustrates the characters and the actors.
Here is a section of the list that describes my character, Shay:
I have learnt how useful a cast list is as it showed some of the characteristics of the characters so it gave the actors more of an understanding of their roles.
Here is a section of the list that describes my character, Shay:
 |
| The list for my character |
 |
| The Cast List |
I have learnt how useful a cast list is as it showed some of the characteristics of the characters so it gave the actors more of an understanding of their roles.
R&P Post 15: Our planned filming location/set design/props
Filming Locations:
We have two filming locations:
We have two filming locations:
- Bowyer's Water
- Alex's House in East Finchley
Below is the set list (with the prop list incorporated):
 |
| The set and prop list |
We created a set list to clearly show the locations and the sets that we will create. For example, the first location is Bowyer's Water which contains the sets of the lake and the bench. Similarly in the house location the sets are, the bedroom, the kitchen and the hall.
Set Design/Props:
The prop list has been very helpful as it acts an organisational device that we used to make sure that we had all the correct pops for each setting.
From creating the set and prop list I have developed my skill in this and found it a useful piece of pre-production.
Set Design/Props:
The prop list has been very helpful as it acts an organisational device that we used to make sure that we had all the correct pops for each setting.
From creating the set and prop list I have developed my skill in this and found it a useful piece of pre-production.
R&P Post 14: Our Call Sheet
We have created a call sheet as it is a good organisational device and should hopefully make the main shoot run effectively.
Included in it is:
Included in it is:
- Call times
- Locations
- Telephone numbers
These will help the actors and technicians know where to meet, at what times etc.
Here is our call sheet:
I have learnt how useful even a basic call-sheet is as everyone knows where to be and when.
Here is our call sheet:
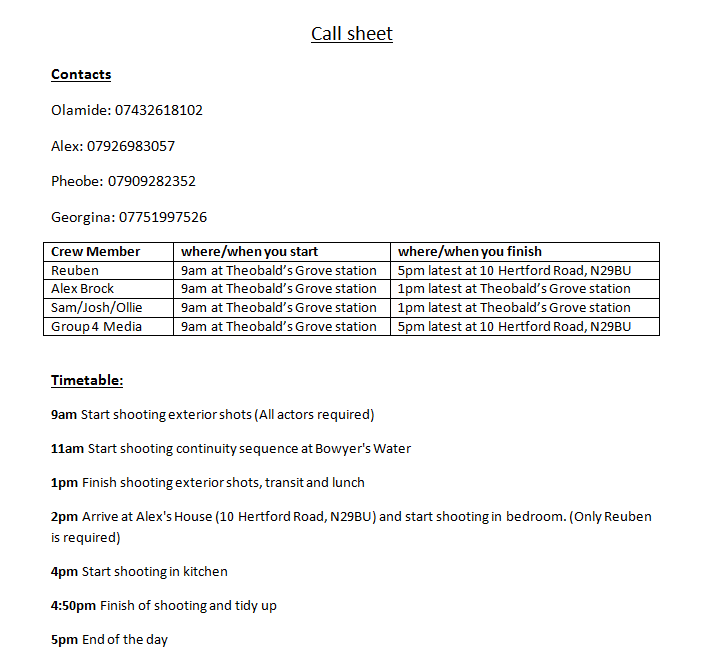 |
| Call Sheet |
R&P Post 13: Our Shoot-Board
 |
| The first page of our storyboard for the house scene. |
The storyboard was useful as it made the shoot day very proactive and time-efficient as we did not waste time. It also helped when we were editing the rough cut as we already had written down which shots were the best so we could spend time on the actual editing.
After the test and main shoots we adapted the shoot boards from seeing which shots worked and which didn't. We also recorded down alternative versions of shots to try which then gave us more options for continuity editing.
I have learned how useful the shoot-board and how it saves time when both shooting and editing.
R&P Post 12: Our Animatic
For our animatic we took live stills based on our post-it notes from our storyboard:
We then used Adobe Premier Pro to create the animatic which involved putting the different clips on the time line, editing them together, adding the music, voice over and titles.
From doing the animatic we found that we needed a shot of all the records before Craig picks one up and puts it on the record player. It was interesting recreating the shots from the post-it notes and it helped us frame the different shots. Overall, the animatic was very useful as it has given me a clear idea of what our opening will look like.
 |
| Improvements |
We gave ourselves feedback and also got comments from staff.
R&P Post 11: Our Timeline and Storyboard
 |
| Part of the timeline |
Our storyboard is a large piece of sugar paper onto which we have put our post-it note shots. We have used our story board to put the different shots in order-which we did a lot at the beginning of the planning process as we worked initially to get lots of shots down and then put them into a suitable order.We have used different coloured post-it notes to achieve variation in shot types. For example, our colour code is:
- Orange=Close Up
- Yellow= Mid Shot
- Blue= Long Shot

Phoebe and I holding the storyboard

 |
| A close up of a shot |
Our storyboard has been very useful as the post-it notes clearly show the layout of the different shots but can also be easily moved around into different orders and we have put the pictures of the notes onto our shoot board.
We also used Elephant (2003) as an influence for one of our shots as they used titles superimposed onto the sky which we have used for our title.
The storyboard has helped us to see if the shots fit together and we have been able to spot if there have been any continuity errors and correct them before the next stage in planning.
Following our test shoot we have changed parts of our storyboard that didn't work very well. For example, we omitted the sections at the WWII ruins as it was not clear why he was there and in its place we have put more shots of him looking reflective when he is right by the lake.
The storyboard and timeline have been very useful and I have learnt how they will continue be important in the rest of the project as they are useful sources to be able to refer back to.
 |
| Elephant Opening |
We also used Elephant (2003) as an influence for one of our shots as they used titles superimposed onto the sky which we have used for our title.
The storyboard has helped us to see if the shots fit together and we have been able to spot if there have been any continuity errors and correct them before the next stage in planning.
Following our test shoot we have changed parts of our storyboard that didn't work very well. For example, we omitted the sections at the WWII ruins as it was not clear why he was there and in its place we have put more shots of him looking reflective when he is right by the lake.
The storyboard and timeline have been very useful and I have learnt how they will continue be important in the rest of the project as they are useful sources to be able to refer back to.
Subscribe to:
Comments (Atom)